|
To enhance the model further,
the nicely molded accessories were refined as well. I'll explain each one in turn:
Tank Commander
- The Tank Commander figurine is depicted wearing Nomex (flame resistant) coveralls, gloves, and standard Combat
Vehicle Crewman (CVC) helmet. The arms are articulated, allowing it to be posed with the arms up or down. The pose of the
figurine is stiff, with the spine arched backwards, and head straight; thus I believe the sculptor intended the figure to
be looking through the binoculars.
All mold lines on the figurine
were removed with a file; filler putty added to the gaps around the body, then smoothed with sandpaper. It was then base coated
with these Tamiya acrylic paints:
CVC Helmet: XF-62 Olive
Drab
Helmet Webbing: 1/2 XF-51Khaki
Drab with 1/2 XF-64 Red Brown
Coveralls: 1/2 Tamiya XF-65
Field Gray and 1/2 XF-51 Khaki Drab, lightened with XF-59 Desert Tan
Face: XF-15 Flesh, shaded
with XF-64 Red Brown, and highlighted with a small amount of XF-2 White
Gloves: XF-58 Olive Green

|
| Note the binocular lens and zipper pulls |

|
| The helmet has microphone wires added |

|
| The face was repainted with shading and highlights |
In general, highlights
were applied by brush with the dilute base color mixed with a small amount of white acrylic paint. A small amount of black
paint is mixed with the base color, then heavily diluted and used to add shading. Repeated applications will build up the
depth of the highlight colors and shade to the desired effect.
Finally the arms were glued
in the upright position so it appeared the Tank Commander was looking through the binoculars. A little more filler putty was
smoothed into the gaps at the shoulders, and the paint was touched up. For an extra bit of realism, tiny copper wires were
used to replicate microphone cables, and small bits of paper were glued on as zipper pull tabs. The lens of the binoculars
were painted with a purple-red mix, then sealed with several layer of gloss clear to replicate the anti-laser reflective coatings.
The figure can be further
modified with a chest harness for a M9 Beretta pistol, body armor, unit markings/nametags and goggles added to the helmet.

|
| A trigger plate, retaining chains and ammo chute were added |
M2 50.cal HB Machine Gun- The second most powerful weapon on the
Abrams is the Tank Commander's 50 caliber machine gun. It was designed by the famous firm, Browning Firearms during World
War 1, and in use since then. Current stocks are made by Saco Industries of Maine. The
M1 and M1A1 variants use the M2 50 Cal. in a powered sub-turret, fired by remote control.
On the M1A2, the 50 Cal. is on a simple pintle mount, fired manually. The powered
sub turret is referred to as a cupola and called the Commander's Weapon Station (CWS) and the .50 Cal. can be fired from inside
or outside the hatch. The M1A2 has the Improved Commander's Weapon Station (ICWS). The motors in the M1A1 powered sub-turret
have been replaced with digital flat screen display panels in the M1A2.

|
| Ammo box with new lid, handle, and iron sights |
Tokyo Marui's sculpt of
the M2 50 cal. is quite accurate. I removed it from the attached sprue, and cleaned off all mold lines, and filled 2 tiny
ejector pin holes. I added the characteristic "H" shaped thumb trigger plate from clear blister plastic. I then drilled a
small hole so the buffer passes through the trigger plate. Thin copper was attached to the base of the cocking lever, and
the manual sights and gun barrel were drilled out. The entire machine gun was painted black and highlighted with gun metal
paint. The gun mount was then painted NATO green to match the rest of the tank, and tiny retaining chains were added to the
weapon. 50 Cal. ammo
cans are normally a semi gloss dark olive drab color but since they are recycled; a repainted ammo can could be black.

|
| Firing cable, and retaining chains were added |
M240 7.62 mm Machine Gun- At the loader's station is a M240 7.62 mm machine gun used for anti-personnel
defense. It is designed by the Belgian firm Fabrique Nationale (FN), and is considered
to be highly accurate and durable. Another M240 is slaved to the M256 cannon, serving as the coaxial machine gun.
Not much is needed
to detail the M240 molding. As with the 50.Cal, the barrel was drilled out, retaining chains added, and a looped charging
cable installed. The charging cable is used to pull the bolt back and load the weapon. The 7.62 mm ammunition box was
detailed with a carrying handle, and dry transfer stenciling, and painted as well.
Hull Details- Tiny retaining chains with pins were added to
end of the last side skirt segments. The rear of the engine deck was detailed with two C shaped lifting hooks made from brass
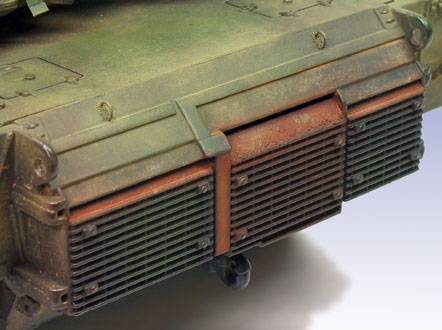
wire. All tow hook attachment points were drilled out; they are found at the corners of the vehicle. Several shades of red, orange, and brown acrylic paint were then used to replicate the rust on the center
engine exhaust grills, resulting from the hot exhaust of the turbine engine. Only the center rear engine grill is for the
engine exhaust. That grill gets black and dirty/rusty, etc. The right and left grills are for the primary transmission and
auxiliary transmission oil coolers. Only hot air is passed through this and they don't get weathered like the center grill.
The vehicle headlight apertures were drilled out, and replaced with model rail road lenses. The Driver's center periscope was further detailed with wiper
blades made from thin brass wire.

|
| The headlight lens, retaining chains and periscope wipers help detail the hull |

|
| The left and right exhaust grill do not normally exhibit rusting |
Turret
details- I've opened up my Abrams on several occasions to clean the interior. I used one of these cleaning sessions
to install periscope lenses into the tank from the inside. The real Abrams use an anti-laser reflective coating on all optical
devices. It is used to protect the crew from eye damage should an enemy target their vehicle with laser designators. The actual
coating is quite peculiar; it appears purple, green, red, or blue at different angles. It is a bit difficult to replicate;
Mylar strips can be used, but the results can look a bit garnish at times.

|
| PVA/carpenter's glue will not leave smudges when attaching the film |
The best compromise
for me is to use exposed 35mm film. I cut off the end strip of the film; it is a dark brown-purple color with a bit of red
in its reflection. Every periscope was given a film cutout to replicate the anti-laser lens, followed by a layer of clear
plastic on top of it for added depth. This was also added to the Gunner's Primary Sight (GPS) and CITV as well.

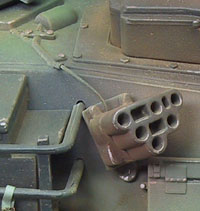
The smoke grenade
launchers on each side of the turret can be detailed with electrical firing cables made from thin copper wire. They exit from
the turret top, along the armored sheath and attach to the rear of each grenade launcher.
The rear of the turret
houses twin blast panels that contain the main gun ammunition. These blast panels vent the force of the explosion away from
the crew should the turret get hit in combat. I detailed the 6 circular protrusions with rectangular strips and bolt details.
These circular protrusions have been erroneously called vents in some modeling publications. They are simply attachment points
for the ammunition cradle, used in some late model Abrams.

|
| The lifting lugs allows the blast panels to be removed and fresh 120mm rounds to be inserted quickly |
To continue, click on the link below:
Modifications: Detailing Page2
|

