|
Turret
bustle and lockers- On the rear of the turret, I added 8 round tie-downs on the bottom of the bustle. These
were replicated with 1/8" brass eyelets found in model ship supply stores. Small holes were drilled into the bustle rack;
the stem of the eyelets were cut to length and then glued into each hole. The
back of the turret has 4 flat horizontal pegs molded on. These are the locations of flat U shape equipment tie downs on the
actual tank. I removed the plastic pegs, and replaced them with brass wire replicas.

|
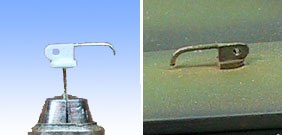
| The bustle rings are used to attach straps to hold the crew's gear |
|
| The side lockers holds vehicle maintinance tools |
There are two large stowage
lockers (turret sponson boxes) on both sides of the turret. I replaced the locker handles with replacements bent from brass
wire, and mountings made with thin plastic sheet. A hole was then drilled in the plastic mountings. On the actual Abrams,
a small padlock is used to secure the lockers through the mounting hole.
I didn't add these
details, but the right hull stowage locker can also have the handles replaced. On the real tank, there is a thin rubber dust
flap between the top of the side skirts and the entire length of hull sides attached with rivets. This can be replicated with
thin plastic strip, or sculpted with epoxy putty.
Radio Antennas-
On the original Abrams tank, the radios were UHF only; identified by having 2 antennas
of different lengths. The tall antenna was for the transmitter/receiver and the short antenna was for the auxiliary receiver
(called the "Aux"). This allowed the Tank Commander to monitor two nets simultaneously, but he could only transmit on one
net unless he changed the frequency.
Once SINCGARS (Single Channel Ground/Airborne Radio System) were fielded, a dual
SINCGARS radio system could fit in the same space occupied by the old VRC-12 series radio. Now all tanks had the ability to
fully operate on two frequencies at once. The much improved SINCGARS radios have 2 short antennas of equal length, and
feature the ability to transmit and receive encrypted voice and text data, and are resistant to jamming by the enemy.
|
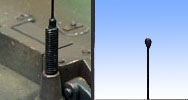
| Piano wire gives excellent radio reception |
The antennas supplied with
the tank are too thick, and shiny for realism, thus I used .001 diameter steel piano wire to replace them. Each wire is 5
inches long, with the ends bent to the same shape as the original antennas. Thus they plug in exactly the same way as the
originals. I also wrapped thin copper wire at the base of each antenna to replicate
the flexible portions. The ball tips of the antenna were made by repeatedly dipping it into CA glue, until a round shape was
formed.
I also created replacement
antennas cut to the same length as the originals, approximately 12 inches. This
is useful because the shorter (5 inch) antenna decreases the reception range, especially if the tank is used indoors, where
there is more RF interference from household appliances.
T-158 Track-
On early Abrams tanks, there were problems with premature track life on the T-156 series of tracks. Later M1A1 Abrams featured an improved T-158 track with replaceable rubber track pads. I purchased a set
of hard plastic (ABS) replacement tracks made by Tokyo Marui specifically for the Abrams tank. The separate track links look
a lot more realistic, and puts less tension on the gear box, improving battery life and play time. Each link has a small injection
mark on the inside of the track. The outer face of the track has the frame of the rubber pads molded in.
|
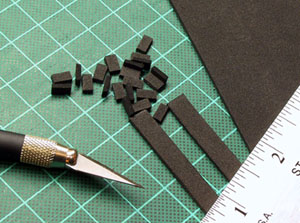
| The foam pads dramatically improves traction |
In order to improve both
traction and realism, I added to each track link, a pair of pads made of thin foam rubber. The foam rubber I used is spongy
in texture, and can be purchased as sheets in craft stores, black in color, and 1/16" inch thick. I cut several thin
strips of foam approximately ¼" inch wide from each sheet. Each strip was then cut into little segments, approximately
400 in all! I spent over 4 hours gluing all the track pads in place with a small
amount of CA glue. When in place, I then trimmed each track pad flush to the pad frame with a sharp razor, for better fit.

|
| The wash of rust paint gives a more realistic appearance |
The track links are molded
in a dull steel color. To further improve realism, I liberally flowed dilute brown and orange acrylic paint into the crevices
of each track, to simulate rust. The paint further stiffened the rubber foam pads, allowing greater resistance to road wear!
The final product is extremely realistic looking, after a run or two on the pavement; the track pad takes a ragged and torn
appearance, with slight rust showing in the corners of each track link!
Suspension-
In the Abrams tank, the suspension system is considered first class. Using a simple yet effective torsion bar system with
rotary shock absorbers, it is easy to repair and replace and allows for a smooth ride. This is essential for crew comfort
but more importantly is a major contributor in allowing the crew to attain a 90% first hit probability.
Due to its size the Tokyo
Marui Abrams does not use torsion bars. Rather the dual road wheels are attached to swing-arms with extension springs to absorb
irregularities in the road surface. Some springs are low in tension with the
thicker high tension springs are used in the rear of the tank to support the weight of the motors and batteries.
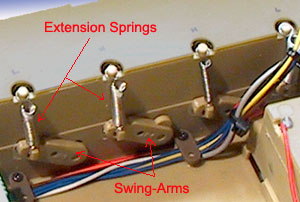
|
| Take care not to break the tabs on the swingarms |
By replacing some
of the factory installed springs, you can have a model that moves in a much more realistic manner. As installed, the springs are a bit tight, and the Tokyo Marui Abrams has a tendency to bounce a bit on
rough ground. By tuning the suspension with low tension springs, the model hugs
the ground, gently moving up and down over terrain giving the impression of a heavy vehicle in motion.
Replacement
springs are not difficult to find. I purchased a set from a hardware store, and the box included extension and compression
springs in an assortment of lengths and diameters. In addition the Japanese model
company Wave sells small diameter springs as flexible power cables for Gundam models, or you can use springs in ballpoint
pens and old toys.

|
| Experiment with different diameter springs to get varying tensions |
Getting
the tension you want is a matter of experimentation. In general I cut the springs to the same length as the originals. To
lessen the tension you can stretch the spring a bit by carefully pulling the ends. Use needle nose pliers to bend a circular
tab on the ends of the springs to attach onto the swing-arms and hull of the tank.
You
will notice the tank will no longer make sharp hair pin turns; rather the turning radius will increase. The model will turn
left or right in a smooth, graceful arc, and will look more realistic, especially when moving at high speed. It really does look like a miniature 70-ton behemoth on maneuvers!
In
general, you should use the original high tension springs on the first and last road wheels. The model does not have the ability
to adjust track tension, and using low tension springs at wheels #1 and #7 will cause the track to sag down and experience
difficulties in turns. This is the configuration I currently use:
Tension ---- None High Low
Low Low Med High High None
Wheel --- Idler #1
#2 #3 #4 #5
#6 #7 Drive
To continue, click on the link below:
Modifications: Accesories
|